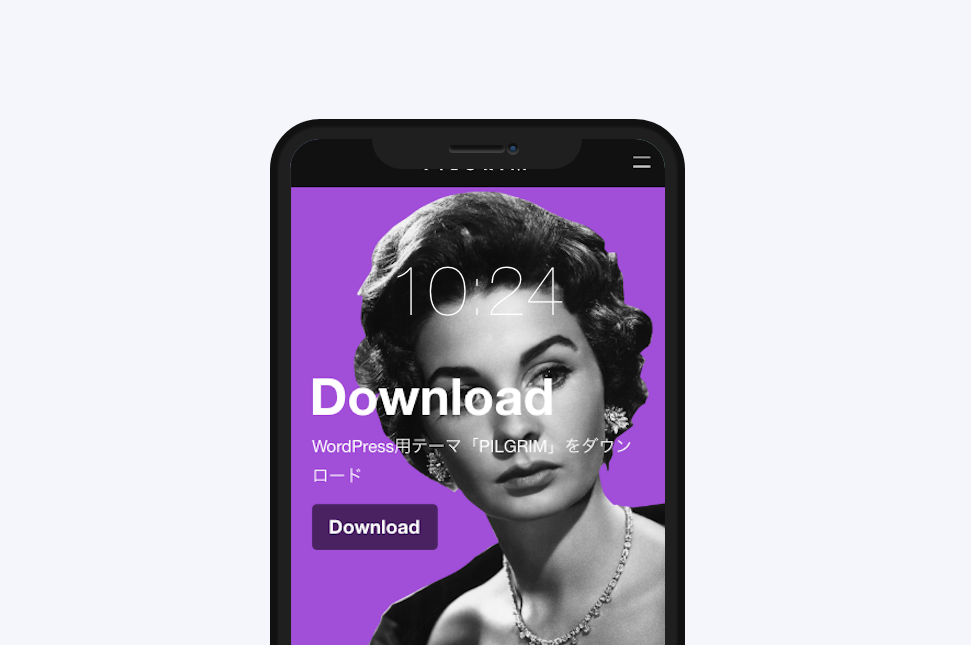
iPhone X のCSSモックアップ(模型)の作り方
CSSのみで作ったiPhone Xの模型の中に、キャプチャした画像を入れ込んで、スマホで見た場合のWebページを、見る側にわかりやすく伝えるためのインターフェイスです。
Photoshopなどの画像編集ソフトが無い場合、もしくはキャプチャした画面をiPhoneの画像にはめ込むのが面倒なときに使えるような、使えないような・・・
模型の中をスクロールできるわけではありません。
HTML
<div id="iphone-x">
 <div class="iphone-x">
  <i>Speaker</i>
  <b>Camera</b>
  <s>10:24</s> <!-- サンプルの時間です。必要なければ削除しましょう -->
   <img src="https://poptoonstudio.x0.com/wp-content/uploads/2020/05/Screen-Shot-2020-05-21-at-7.46.55.png" alt="" class="wp-image-3038"> <!-- ここにキャプチャした画像のURLを差し替えます。サイズは幅375px縦641px。-->
  <span>Left action button</span> <!-- サンプルのボタンです。必要なければ削除しましょう -->
  <span>Right action button</span> <!-- サンプルのボタンです。必要なければ削除しましょう -->
 </div>
</div>
CSS
<style>
#iphone-x {
  background: #f4f6fc;
  padding: 12em 0;
}
.iphone-x img {
    border-bottom-left-radius: 30px;
    width: 375px;
    height: 667px;
    border-bottom-right-radius: 30px;
}
.iphone-x {
  position: relative;
  margin: 0 auto;
  width: 375px;
  height: 694px;
  background-color: #000;
  border-radius: 30px;
  box-shadow: 0px 0px 0px 11px #1f1f1f, 0px 0px 0px 13px #191919, 0px 0px 0px 20px #111;
}
.iphone-x:before, .iphone-x:after {
  content: "";
  position: absolute;
  left: 50%;
  -webkit-transform: translateX(-50%);
          transform: translateX(-50%);
}
.iphone-x:after {
  bottom: 7px;
  width: 140px;
  height: 4px;
  background-color: #f2f2f2;
  border-radius: 10px;
}
.iphone-x:before {
  top: 0px;
  width: 56%;
  height: 30px;
  background-color: #1f1f1f;
  border-radius: 0px 0px 40px 40px;
}
.iphone-x i,
.iphone-x b,
.iphone-x s,
.iphone-x span {
  position: absolute;
  display: block;
  color: transparent;
}
.iphone-x i {
  top: 0px;
  left: 50%;
  -webkit-transform: translate(-50%, 6px);
          transform: translate(-50%, 6px);
  height: 8px;
  width: 15%;
  background-color: #101010;
  border-radius: 8px;
  box-shadow: inset 0px -3px 3px 0px rgba(255, 255, 255, 0.2);
}
.iphone-x b {
  left: 10%;
  top: 0px;
  -webkit-transform: translate(180px, 4px);
          transform: translate(180px, 4px);
  width: 12px;
  height: 12px;
  background-color: #101010;
  border-radius: 12px;
  box-shadow: inset 0px -3px 2px 0px rgba(255, 255, 255, 0.2);
}
.iphone-x b:after {
  content: "";
  position: absolute;
  background-color: #2d4d76;
  width: 6px;
  height: 6px;
  top: 2px;
  left: 2px;
  top: 3px;
  left: 3px;
  display: block;
  border-radius: 4px;
  box-shadow: inset 0px -2px 2px rgba(0, 0, 0, 0.5);
}
.iphone-x s {
  top: 50px;
  color: #fff;
  text-align: center;
  text-decoration: none;
  width: 100%;
  font-size: 70px;
  font-weight: 100;
  padding-top: 60px;
}
.iphone-x span {
  bottom: 50px;
  width: 40px;
  height: 40px;
  background-color: rgba(0, 0, 0, 0.3);
  border-radius: 50%;
  left: 30px;
}
.iphone-x span + span {
  left: auto;
  right: 30px;
}
*,
*:after,
*:before {
  box-sizing: border-box;
}
@media (max-width: 476px) {
#iphone-x {
    width: 100%;
    padding: 5em 8%;
}
.iphone-x {
    width: 265px;
    padding: 0%;
    height: 517px;
    border-radius: 20px;
    box-shadow: 0px 0px 0px 11px #1f1f1f, 0px 0px 0px 13px #191919, 0px 0px 0px 16px #111;
}
.iphone-x b {
    left: -10%;
    top: -5px;
}
.iphone-x i {
    height: 2px;
}
.iphone-x:before {
    height: 20px;
}
.iphone-x img {
    border-bottom-left-radius: 20px;
    width: 265px;
    height: 490px;
    border-bottom-right-radius: 20px;
}
}
</style>
RESULT
Speaker
Camera
10:24
 Left action button
Right action button
 Left action button
Right action button

 Apple Products Pure CSS Mockup!
Leave a Comment